Some people just don't want to serve their turkey whole and then later go through the stress of cutting out on the dinning and serving ... For people like me, I just want to get it over with. Carve the turkey and set the dinning and go have a nice bath and join the family for dinner.
HERE IS HOW TO CARVE
Get Ready To Carve!
If all went well (and there's no reason it shouldn't), your turkey will be perfectly golden brown and crisp, its thighs coming to 165°F just as the breasts hit 150°F in 80 to 90 minutes. Once cooked, remove it from the oven, take the rack out of the baking sheet, add the pan drippings to your gravy, and let the turkey rest for about 20 minutes before starting to carve.
To begin carving, start by cutting off the first leg by slicing through the joint where the thigh meets the body.
Find the Joint
Next, find the joint between the thigh and the drumstick by rotating the drumstick back and forth. Cut through the joint with your knife, then repeat with the other leg.
No Flying For You!
Remove the wings by locating the ball joint near the top of the breast and working the knife through it.
Remove the Breasts
Hold the breast firmly in place with one hand (a clean kitchen towel can help if you have a slippery grip or fingers sensitive to heat), then slice down one side of the breast, using the tip of the knife to follow the contour of the bone.
Peel it Away
Continue using the tip of the knife so slowly work the meat away from the breast bone, pulling outwards at it with finger tips to separate the meat from the bone (again, a clean towel can help if you have sensitive fingers).
Almost there...
As you continue to slice, the breast should fall away in one complete piece. Make sure you take the tenderloin along with it.
Repeat
Repeat for the other side. You now have two breast halves, two drumsticks, two thighs, four wing pieces, and one carcass from which to pick meat for leftovers soup.
Slice
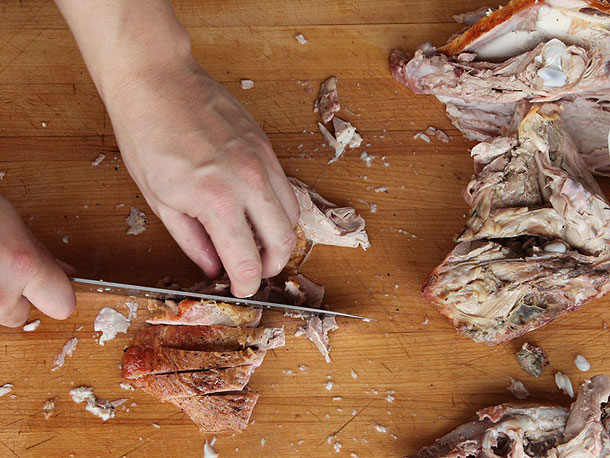
To continue cutting into serving pieces, slice each breast into even slices on a bias. Transfer to a warm serving platter.
The Hippy Hippy Shake
The hip bone is still attached to the back of the thighs and must be removed. To do this, pick up the flat bone from one side and shake it gently back and forth until the thigh bone pops out of its socket.
Popped Hip
Pry away the hip and save it along with the carcass for soup.
Get The Thigh Meat
Cut along one side of the thigh bone with the tip of your knife, removing as much meat as possible along that side.
And The Rest
Repeat on the other side of the bone. Save the bone along with the rest of the bones for soup.
Slice Dark Meat
Slice the dark meat across its width into thin serving portions and add it to the warm platter.
Ready to Serve
Who needs a large bird centerpiece when you've got a platter-ful of perfectly cooked meat and crisp skin to pass around? I promise you: your guests will not want to miss it!
by:serious eat


Comments
Post a Comment