Spatchcock Roast Turkey Recipe
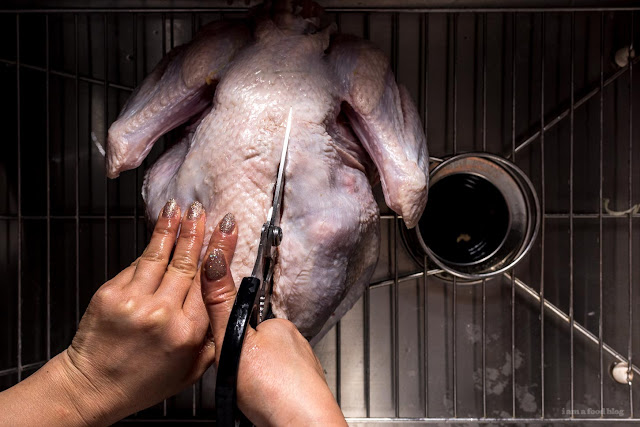
Spatchcocking, if you haven’t heard, is just a fancy way of saying removing the backbone and flattening. There are several reasons why it’s superior to roasting a bird whole.
Reasons why you should spatchcock:
- When you cut out the backbone, you get to use it to make gravy and stock, right away without having to wait for the drippings off the bird.
- Flattening the bird helps it cook evenly and quickly – I’m talking about finishing a turkey in about an hour and twenty minutes.
- The flatter profile means that all of the turkey skin is facing up, exposed to the heat which means crispier turkey skin. Bonus, the meat is juicier because the skin renders the fat right into the meat, instead of just falling down into the pan.
- Spatchcocking means even cooking. White and dark meat cook at different rates and flattening out the bird so that the legs and thighs aren’t protected underneath the breast means that you’re exposing the dark meat to heat that would otherwise not reach it
Anyway, here’s how you do it! I included a citrus herb butter but you can go ahead and just season with just salt and pepper or whatever you heart desires. Personally, I feel like turkey has a very distinct flavor and doesn’t need too much help, much like a very good roast chicken, but feel free to play around. The important part is spatchcocking, so everything else is just gravy ;)
happy turkey-ing!
SPATCHCOCK ROAST TURKEY RECIPESERVES 10-12
Rosemary Citrus Butter
- 1/4 cup fresh rosemary, leaves only
- 6 cloves garlic
- 1 orange, zested
- 1 lemon, zested
- 1 tablespoon fresh lemon juice
- 1 tablespoon extra virgin olive oil
- 1/2 teaspoon kosher salt
- 1/2 teaspoon black pepper
Turkey
- 1-2 onions, quartered
- 1 orange, halved
- 1 lemon, halved
- 10-12 rosemary sprigs
- 2 stalks celery, roughly chopped
- 1 whole turkey, the smallest you can find, about 11-12 lbs
- 1 tablespoon oil
- salt and freshly ground pepper
METHOD
Blend or food process the rosemary citrus butter ingredients together. Set aside.
Adjust your oven rack so that it’s in the middle of the oven. Heat oven to 450°F. Foil line a large deep baking tray. Place the onion, orange, lemon, celery, and rosemary sprigs on the foil, then place a wire rack on top of the vegetables.
Pat the turkey dry with paper towels. Flip so that it’s breast side down. Hold the turkey firmly and use a pair of kitchen shears to cut alongside the backbone, starting where the tail meets the thigh. Cut all the way up until the turkey is split up to the neck. Push the turkey open slightly and then repeat on the other side, carefully cutting alongside the other side of the backbone. This side may be a bit trickier, so go slow.
Trim off any excess fat or skin you might see. I took off the tail and the hood of fat near the neck.
Flip the turkey over so that the breast is facing up and push down on the ridge breast bone, hard. You should hear a couple of cracks and the turkey should be flatter. Tuck the wing tips behind the breast. Place the turkey on your prepared rack and baking sheet and rub with 1 tablespoon of oil. Season with salt and freshly ground pepper.
Transfer to the oven and roast, for about an hour and twenty minutes, rotating halfway, or until the deepest part of the breast is 150°F, and the thighs are at least 165°F. At the 50 minute mark, carefully and evenly brush on the rosemary citrus butter. If at any point the turkey skin starts to look too brown, you can tent it.
When the turkey is cooked, remove from the oven and let rest for 15-20 minutes.
To carve: start out by removing the legs by cutting through to where the thigh meets the body. Find the joint between the thigh and the drumstick and cut through the joint. Find the joint of the wing near the top of the turkey’s breast and working the knife through it, removing the wings. You can leave the wings whole or spilt them by cutting along the joints.
Remove the breasts by slicing down the center, near the breast bone, using the tip of your knife to follow along the shape of the bone while peeling the breast away slowly. As you continue to slice, the breast should fall away in one piece. Repeat on the other side. Slice the breast into even slices. Remove the thigh meat away from the bones, saving all the bones for stock or soup. Arrange everything on a platter. Enjoy!!!
BY STEPHANIE


Comments
Post a Comment